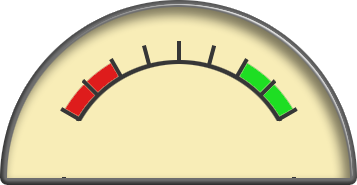
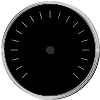
jQuery Analogue Meter
As part of a project written in Grails to analyse the SMS messages which came into the BBC Radio studio, I put together a user interface in Javascript that showed the incoming rate of messages. The idea was to present this as a speedometer. I also added a meter, much like an analogue VU meter, that showed the general overall sentiment of the messages. The underlying widget for this is available here.
Here's a quick demo of it working, using a random number generator:
Photo credit: Trestlewood.com
To use it, you first need to include a few other javascript libraries. In particular, you
require jQuery and the jQuery widget factory, but the code also uses canvas_utils.js (for
drawing polygons) [get it here] and jquery.timers (for its animation).
<script type="text/javascript" src="//ajax.googleapis.com/ajax/libs/jquery/1.10.2/jquery.min.js"></script>
<script type="text/javascript" src="//ajax.googleapis.com/ajax/libs/jqueryui/1.10.3/jquery-ui.min.js"></script>
<script type="text/javascript" src="/js/canvas_utils.js"></script>
<script type="text/javascript" src="/js/jquery.timers-1.2.js"></script>
<script type="text/javascript" src="/js/MeterWidget-1.0.js"></script>
You also need some graphics to use as the meter backdrop and the glass overlay. The meter widget has defaults which set it up to work correctly for the following images:

It expects to find these two images (dial-back.png and glass.png)
in the /images/ directory. If you are not storing your
images here, you will have to override the default options (options meter and glass)
with your own locations (see below).
To create the basic widget, create an element in the page and then apply the meter widget to it, just as you would with any jQuery widget:
<div id="meter"></div>
<script type="text/javascript">
	$('#meter').meter();
</script>
Once created you can call the setLevel method to set where the meter points to. The default
range is 0 to 8 and it is set, by default, to level 4. The example at the top of the page is generating random
values between 0 and 8.
You can alter the range of the meter using the minLevel and maxLevel options. The
useStoppers option, if true, will stop the needle shooting past this minimum or maximum values if a level
larger than those is given. If useStoppers is false, values greater than the maximum can be provided
and the needle will just rotate proportionally. The options minAngle and maxAngle give
the angles, in degrees, at which the minimum and maximum values appear on the dial (where zero degrees in straight up).
Take a look at this dial:
This dial is set up using the following initialisation code:
$('#meter').meter({
	meter: "/images/speedo-back-small-100.png",
	glass: "/images/speedo-glass-small-100.png",
	width: 100,
	height: 100,
	maxAngle: 135.5,
	minAngle: -135.5,
	needlePosition: [50,50],
	needleScale: 0.5,
	maxLevel: 180
});
The image are set with the meter and glass options and are these:

These images are both 100x100, so the widget is also forced to this size using width and
height options. The minimum value for the dial
is at the bottom left, 135 degrees anticlockwise from the vertical, and is set with the minAngle option.
As the dial is symmetrical, the maximum value is at the bottom right, at 135 degrees clockwise from vertical,
and set with the maxAngle option. The position of the needle's centre of rotation
is in the centre of the dial, so set to 50,50 with the needlePosition option.
The default needle is 100 pixels long, so we change that here to 50 pixels
by setting the needleScale option to 0.5.
The easeSpeed option gives the number of milliseconds between each frame of the animation, so larger
numbers make the needle move slower to its final destination, but it will also be jerkier. The default is 10 milliseconds
between each frame. The easeAmount option determines how fast the needle decelerates towards its final
destination. The smaller the number the slower it will reach its destination. Here's a larger version of the speedo
dial with some alternate easing values:
	$('#meter').meter({
		...
		easeSpeed: 5,
		easeAmount: 0.02,
		...
	});
The useClip flag tells the renderer whether to mask the needle polygon using a clipping polygon.
The example at the top of this page uses the clip to avoid the needle being drawn over the bevel around the edge of
dial at the bottom. If you are using a circular dial, this can be disabled. Set the needleClip option
if you need a shape other than the default (it takes an array of [x,y] vertices to define a polygon).
Here's a list of all the options:
- level
- initial level. default = 4
- minLevel
- Minimum value. default = 0
- maxLevel
- Maximum value. default = 8
- minAngle
- Angle of the needle at minimum value. default = -61
- maxAngle
- Angle of the needle at maximum value. default = 61
- width
- Width of the widget. default: 357
- height
- Height of the widget. default: 185
- backgroundOffset
- Amount to offset the background when drawing. default: [0,0]
- useStoppers
- Whether to limit the needle to within [min,max]. default: true
- useClip
- Whether to apply the clipping polygon. default: true
- mete
- Background graphics. default: '/images/dial-back.png'
- glass
- Overlay graphics. default: '/images/glass.png'
- showShadow
- Whether to add shadow to the needle. default: true
- useEasing
- Whether to ease the needle between values. default: true
- easeAmount
- Deceleration amount for easing. default: 0.1
- easeSpeed
- Animation frame delay (milliseconds). default: 10
- easeEnd
- Difference value below which animation stops. default: 0.01
- needleColour
- Fill style of the needle. default: '#700'
- needleHighlightColour
- Fill style of the highlight polygon of the needle. default: '#D44'
- needleShadowColour
- Fill style of the needle shadow polygon. default: '#B00'
- shadowColour
- Fill style of the shadow of the needle. default: '#444'
- shadowOffset
- Amount by which to offset the shadow. default: [-2,-2]
- needleScale
- Scaling of the needle polygons. default: 1.8
- needlePosition
- Position of the needle's centre of rotation. default: [178,175]
- needleShape
- Polygon defining the needle's shape. [[x1,y1],[x2,y2]...]
- needleHighlight
- Polygon defining a lighter part of the needle's shape
- needleShadow
- Polygon defining a darker part of the needle's shape
- needleClip
- Needle clipping polygon.
- title
- The title of the widget, drawn if not empty. default: ""
- titlePosition
- Position to draw the title (either 'above', or 'below'). default: "below"
Here's another slightly silly example. This is three meters all stacked on top of each other. The bottom one shows hours and has the backdrop, the middle one has no backdrop nor overlay and shows minutes, and the top one has no backdrop but a glass overlay and shows the seconds. Notice that in this example, the second hand has been reshaped. Obviously, there's a bit of an issue with using the meter for this when the hands get to their final value and return to 0.
I got the clock image from Google Image Search.
The code is released under the MIT license, which basically means you can do whatever you like except pretend it's yours.